Tag: tools
Understanding GPT Tokenization
Posted by bsstahl on 2026-06-12 and Filed Under: tools
Introduction
Tokenization isn't just a billing detail when using Large Language Models (LLMs), it shapes prompt budgets, context limits, and is often a key reason behind a model's surprising behavior. If you're building production systems or wrangling LLMs in real-world code, understanding how tokenization actually works isn't optional, it's engineering hygiene. Ever struggled with a model answer that gets mysteriously cut off, or wondered why your prompt "should fit" but doesn't? That's likely to be tokenization at work.
When I reached the point of needing to understand the Tokenization process better, I turned to the standard implementations to learn the mechanics, and found them nearly impenetrable. Tokenization tools are optimized for speed and efficiency, and the structure that makes them fast also makes them hard to follow. So I built a clarity-first C# implementation, one designed to make the Encode and Decode flow easy to inspect, not fast to run. This article walks through that implementation, covering the core replacement data, the encoding and decoding flow, and a few findings that show how tokenization reflects usage patterns in real data.
BPE Tokenization in natural language processing (NLP)
Why Tokenization?
NLP models use tokenization instead of working directly on raw UTF-8 bytes because tokens better match how we, as developers and users, experience language in code and text. Have you ever tried to shoehorn user input from a legacy system into an LLM and wondered why it doesn't behave exactly as you'd expect? That's where understanding tokenization offers an edge.
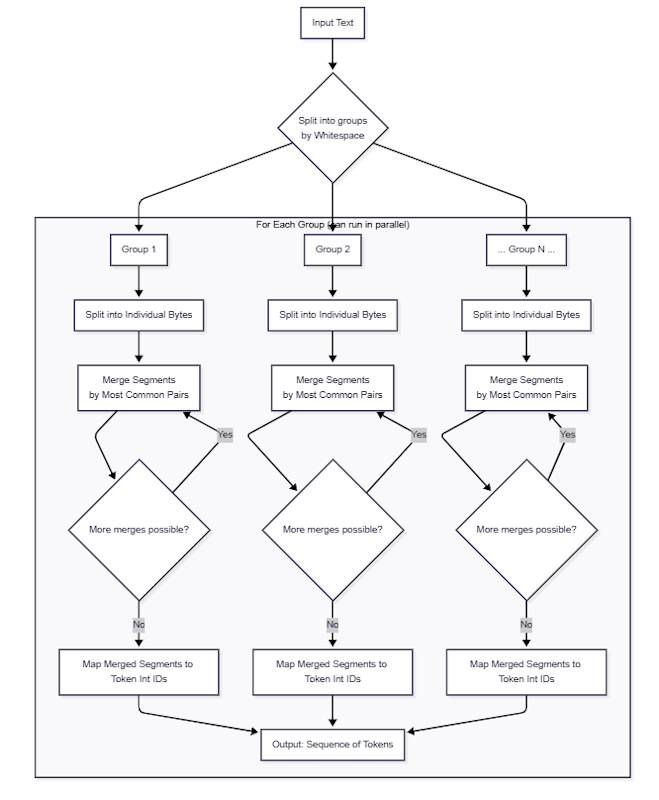
BPE (Byte-Pair Encoding) Tokenization is the process of converting text input into a numeric form that machine learning models can interpret. During this process, text strings are broken into groups by whitespace. These groups are broken into segments, individual bytes to start, which are then iteratively merged with the following segments in the same group based on the commonality of their usage. Eventually, these merged segments are mapped to one or more unique integer values called tokens. This numerical representation allows algorithms to perform operations on textual data since the models require quantitative inputs.
The cl100k Tokenization Model
The cl100k tokenization model is the one you'll use if you're building anything on OpenAI's GPT stack. Imagine it as a massive lookup table, translating your handwritten instructions, code comments, and edge-case data straight into numbers the model can reason about. This tokenizer is a core part of GPT model performance.
Token boundaries follow frequency, not human intuition, about what counts as a "word." To make this concrete: a less common presidential name like Coolidge has no single-token form at all in the cl100k model. This name, like many others, requires multiple tokens to represent, because it simply did not appear often enough in the training data to earn representation as a single token. On the other hand, Taylor maps to not one but two tokens: ID 16844 with a leading space, and ID 68236 without a space, because it appears frequently enough in both forms to each earn these dedicated entries. And the pattern is not limited to English: the Russian word размер (meaning "size" or "dimension", with a leading space) is token ID 100147, captured because Russian-language content appeared frequently enough in the training data to earn it a place in the table alongside common English words.
The cl100k Tokenizer Sample Code
The clarity-first, object-oriented implementation of a Tokenizer is written in C#, my language of choice. I suspect it will be easy to have it translated into nearly any other programming language if that will make it easier for you to understand. The goal of this implementation isn't speed, it's transparency. You can step through Encode and Decode to see exactly what's happening. The code is available on GitHub.
cl100k Tokenization Replacements
The key to the tokenization process using cl100k is the replacements data, found in the cl100k_base.tiktoken file in the code sample. This file contains a list of Base-64 encoded strings, and the token that each string represents.
While the official replacements file lists the token byte sequences, it can be difficult to tell the practical meaning of each token. This is especially true for whitespace, control characters, or unprintable bytes. For a fully decoded, human-readable table showing what each cl100k token actually represents (including both printable and non-printable tokens), see this table.
How Encode and Decode Work in the Sample
At a high level, the replacements file is the source of truth for both directions. Encode starts with text and produces token IDs. Decode starts with token IDs and reconstructs text.
Encode follows this flow:
- Convert the input string to UTF-8 bytes.
- Scan those bytes from left to right.
- At each position, find the best matching byte sequence from the replacements table.
- Emit the corresponding token ID.
- Advance the cursor and repeat until all input bytes are consumed.
Decode performs the inverse operation:
- Read each token ID in sequence.
- Look up the byte sequence for that token.
- Append those bytes to a buffer.
- Decode the final byte array as UTF-8 text.
Because both methods use the same replacement mappings in opposite directions, a valid input should round-trip cleanly: text → tokens → text.
Invalid UTF-8 Sequences
One of the things that concerned me when learning about this process was the fact that a number of tokens translated to invalid UTF-8 sequences. This seemed wrong at first because all input text is encoded as UTF-8 characters. One thing I have found as an engineer is that when something that I know works, doesn't smell quite right, there is a good chance I can learn something by exploring it. In this case, the "smell" is an artifact of training and encoding that generally appears with characters outside the subset most common in English.
I will explain with an example using token 1717. This token is replaced by the byte sequence 0x20 0xC3, which is a space character followed by a byte that does not represent valid UTF-8 on its own. This would be a problem if this token were ever used by itself or at the end of a sequence of tokens since that would leave a byte hanging that couldn't be translated into UTF-8. However, there is no way for a token like this to be used by itself or at the end of a sequence as long as the text it is representing has been properly encoded as UTF-8. Instead, such a token is always followed by at least one additional token, which will result in one or more valid UTF-8 characters.
If for our example, the 1717 token is followed by token 104 (0xAB -- also invalid on its own), it combines with the 0xC3 left over from the 1717 token, forming the sequence 0xC3 0xAB, which is the UTF-8 character ë. Similarly, if 1717 were combined with token 109 (0xB1 -- again invalid Unicode), we'd get the sequence 0xC3 0xB1, the Spanish character ñ.
This means that if we encode the Spanish exclamation Vaya, ñu ("Wow, wildebeest") into tokens, we would get the sequence [53,12874,11,1717,109,84]. Note the 1717,109 combination toward the end of the sequence. These integers represent UTF-8 bytes encoded into tokens. Some individual token values are not valid UTF-8 on their own, but are valid in the full sequence.
Intriguing Token Findings
Once the mechanics are clear, the replacement table becomes an interesting lens into what text patterns appear often enough to become single tokens.
Long Tokens
The longest token in the cl100k table is a sequence of 128 consecutive spaces (token ID 58040). That a string of whitespace this long earned its own entry suggests it appeared with remarkable frequency in the training data, likely from code formatting, markdown rendering, or structured document output. It is not alone: several other tokens exceed 42 characters in length, each a testament to how often that exact byte sequence appeared in the corpus.
Code is a Significant Contributor
The longest readable single token is the Objective-C method name .translatesAutoresizingMaskIntoConstraints (token ID 63570). At 42 characters, it's a single token for one simple reason: the training data was saturated with Apple's developer docs and implementations that use that method call. This is a good reminder that the tokenizer does not know what a "word" is; only what appears together, and how often. It also explains a lot about why these models can be used to generate code; they've absorbed a lot of it.
Alphabet as a Token
The string abcdefghijklmnopqrstuvwxyz, the complete lowercase English alphabet in order, is token ID 68612. That this specific sequence appears often enough to earn a dedicated entry reveals something about the corpus: tutorials, coding examples, password documentation, and educational content all tend to produce it. The tokenizer captured an artifact of how people teach.
The Weight of Common Words
The longest single-token word that is not specifically programming-related is responsibilities with a leading space (token ID 28423). Seventeen total characters, yet common enough in formal writing, corporate communication, and political text to be encoded as a single unit. Its presence reflects the weight of that particular kind of language in the training data.
Social Media's Fingerprint
The word unconstitutional with a leading space (token ID 53925) is a single token for a 17 character sequence. Its inclusion tells us something concrete about what dominated the training corpus: high-volume political discourse on the internet. The tokenizer does not have opinions, but it does reflect the conversations that shaped it.
Other Notable Tokens
Some tokens are notable not for their length but for what they suggest. The sequence -m (token ID 1474) is a fragment that appears constantly in command-line flags and markdown list items. On the other hand, mary (token ID 1563) in lowercase with no leading space, suggests it appeared frequently enough as a standalone common noun or name to earn its own entry, while 事 (token ID 30926), the Japanese kanji meaning "case" or "circumstance," confirms that the model's vocabulary extends meaningfully into non-Latin scripts, not just as byte fragments but as whole semantic units.
Redacted
Interestingly, █████ with a leading space (token ID 93429). A group of block characters used to represent redacted text is a single token. It appeared so frequently in legal documents, government releases, and journalism that the model treats it as a unit of meaning. There is something both darkly funny and genuinely informative about that: the tokenizer has learned that some things are meant not to be read.
The Tokenization of US Presidents Last Names
The tokenization of US presidents' last names is a useful example of how the model handles proper nouns. Some names are represented by a single token, while others require multiple tokens. In general, names that appear more frequently in training data are more likely to have single-token forms. Names that are less frequent, or less likely to appear outside historical contexts, are more likely to require multiple tokens.
Of the 40 distinct last names of US Presidents:
- 7 require more than 1 token to represent in any form
- 20 have only 1 way to represent their name in a single token; with a leading space and initial cap
- 8 have 2 ways to represent the name in a single token; an initial cap, with and without a leading space
- 3 presidents have 3 ways to represent their name in a single token
- Ford and Grant have all 4 possible ways
The fact that Ford and Grant have the most ways to represent their names makes sense since there are so many other reasons to write those words other than to mean the name of the President. The Presidents where the name cannot be represented in a single token generally indicates the lack of mentions of these Presidents in the training data. Since the corpus of training data is from the Internet, it makes sense that the Presidents who have a lower cultural significance in the Internet era would be less likely to have their names represented in a single token. Thus, Presidents Coolidge, Fillmore, Garfield, McKinley, Polk, Taft, and Van Buren all require more than one token to represent their names in any form. These names are also less likely to be represented in the training data as a reference to someone or something else.
Meanwhile, names like Washington, Jefferson, and Johnson, which are more common in the English language, have multiple representations in a single token. This is likely due to the frequency of these names in the US population, which in itself is a nod to the historical and cultural significance of the Presidents themselves.
Note: Derivatives of these names that are not actually the name of the President are not included here. For example: Obamacare. Empty cells indicate names that have no single-token representation.
| President | Tokens |
|---|---|
| Adams | 27329 (' Adams') |
| Arthur | 28686 (' Arthur'), 60762 ('Arthur') |
| Biden | 38180 (' Biden') |
| Buchanan | 85290 (' Buchanan') |
| Bush | 14409 (' Bush'), 30773 (' bush'), 100175 ('Bush') |
| Carter | 25581 (' Carter') |
| Cleveland | 24372 (' Cleveland') |
| Clinton | 8283 (' Clinton'), 51308 ('Clinton') |
| Coolidge | |
| Eisenhower | 89181 (' Eisenhower') |
| Fillmore | |
| Ford | 8350 ('ford'), 14337 (' Ford'), 45728 (' ford'), 59663 ('Ford') |
| Garfield | |
| Grant | 13500 (' grant'), 24668 (' Grant'), 52727 ('grant'), 69071 ('Grant') |
| Harding | 97593 (' Harding') |
| Harrison | 36627 (' Harrison') |
| Hayes | 53522 (' Hayes') |
| Hoover | 73409 (' Hoover') |
| Jackson | 13972 (' Jackson'), 62382 ('Jackson') |
| Jefferson | 34644 (' Jefferson') |
| Johnson | 11605 (' Johnson'), 63760 ('Johnson') |
| Kennedy | 24573 (' Kennedy') |
| Lincoln | 25379 (' Lincoln') |
| Madison | 31015 (' Madison') |
| McKinley | |
| Monroe | 50887 (' Monroe') |
| Nixon | 42726 (' Nixon') |
| Obama | 7250 (' Obama'), 45437 ('Obama') |
| Pierce | 50930 (' Pierce') |
| Polk | |
| Reagan | 35226 (' Reagan') |
| Roosevelt | 47042 (' Roosevelt') |
| Taft | |
| Taylor | 16844 (' Taylor'), 68236 ('Taylor') |
| Truman | 80936 (' Truman') |
| Trump | 3420 (' Trump'), 16509 ('Trump'), 39155 (' trump') |
| Tyler | 32320 (' Tyler'), 100224 ('Tyler') |
| Van Buren | |
| Washington | 6652 (' Washington'), 39231 ('Washington'), 94771 (' washington') |
| Wilson | 17882 (' Wilson'), 92493 ('Wilson') |
Practical Implications for Prompt Design and Debugging
The engineering reality of tokenization emerges when we try to design, debug, or optimize prompts for GPT models. Consider a practical scenario:
Suppose you're designing a prompt for a model with a fixed token budget. You estimate your text should fit easily based on a word count, but your output keeps cutting off. Investigating with a tokenizer, you find that certain whitespace, rare words, or multi-language fragments are converting into many tokens, sometimes two or three times more than expected. For instance, using a phrase like " responsibilities" (which is a single token) is efficient, but a phrase with uncommon names or special symbols may be split into several tokens, reducing your available space for prompts and responses. In multilingual cases, e.g. “¡Bienvenido, размер!”, mixing Spanish and Russian increases token count further because those languages use byte sequences with less efficient mapping.
Knowing this, you can plan your prompts:
- Analyze with the tokenizer to see real token length before submitting text.
- Avoid language or formatting that explodes token count, especially near prompt limits.
- Catch why a model output is unexpectedly short; often, it's not your word count, but unseen token inflation.
A common heuristic is to assume that English words in typical text cost, on average, roughly 1⅓ (one and one-third) tokens per word. This means that a phrase consisting of 3 generic English words, could be estimated at 4 tokens. As we've seen however, that is only a reasonably safe assumption using very typical, English language statements. Once we start getting into programming jargon, or involving other languages or character sets, these estimates become far less valuable. As a result, prompt designers, engineers, and anyone working with LLMs should not just count words, they should analyze tokenization directly to make decisions about what fits, what fails, and why.
Conclusion
Tokenization in cl100k is best understood as a byte-sequence mapping layer between text and model input, not a simple word splitter. Once that model is clear, behavior that looks strange at first, such as token values containing incomplete UTF-8 fragments, becomes expected and understandable in sequence context.
The practical takeaway is that tokenizer awareness improves engineering decisions. Understanding this process helps with prompt design, token budgeting, multilingual handling, and debugging surprising model output. If you step through Encode and Decode with your own examples, the mechanics become intuitive very quickly. To achieve this understanding, the sample code on GitHub is a good place to start.
Tags: ai algorithms csharp code-sample development chatgpt coding-practices
What Counts as AI‑Generated?
Posted by bsstahl on 2026-03-28 and Filed Under: tools
I still have the first camera I ever used - a 126 box camera, similar to a Hawekeye II, that was basically a toy even in its own era. I shot with black‑and‑white film because that's what a kid could afford, and it produced the kind of photos you'd expect from a plastic lens and a shutter that felt like it was powered by hope. One of those photos captured Thurman Munson, the Yankees catcher who would later die in a plane crash, making him something of a larger-than-life figure in my experience. It's not a great photo. It's grainy, off‑center, and full of the accidental foreground clutter you get when you're small, excited, and holding a camera that doesn't care about your artistic intent.
Recently, I ended up with three versions of that same moment:
- The original - a scan of the actual frame I shot as a kid.
- A cleaned‑up version - run through an AI tool that removed some shadows, centered Munson, and erased the stray arms of the people next to me.
- A colorized version - also AI‑assisted, adding color to a scene that never existed in color on film.
All three images are real in the sense that they correspond to something that actually happened, and all three are altered in the sense that every photograph is shaped by the tools available at the time. When I show any version of these images, I could be asked, Is it "AI‑generated"?

Unfortunately, that question really can't be answered without a lot more context. All 3 images used AI as part of the pipeline in some form or another, because depending on how you define AI, even the act of scanning the original likely used a model. The question we really need to answer is: what do we mean when we say something is "AI‑generated"?
The cleaned‑up version of this photo didn't invent anything. It didn't fabricate Munson's face or change the moment. It just did what darkroom techniques, Photoshop, and restoration tools have always done. The colorized version added something new, but colorization has existed for more than a century. The only difference is that a machine did the brushwork instead of a human. What about the original? It's still the moment I captured as a kid with a box camera. The digital version may have passed through modern software on its way to the screen, but the instant in time remains intact.
Even "true" photos can mislead, with or without AI
This is where things get tricky. Any still or moving image can create false impressions with the viewer. Strange lighting, unusual shadows, a frozen instant in time that doesn't really capture the essence of the situation. All of these things happen, and we've experienced them. How many times have you taken a photo of someone who was happy, but looked sad or angry in the shot? Was the dress blue or gold?
In my three images above, the event happened nearly entirely as presented in those photos. Despite that, any of these versions can still create false impressions in the mind of the viewer.
For example:
- It is possible that Munson is talking to someone, or perhaps yelling at them in a way not captured by this frame.
- When I took the picture, there may have been one or more other people just outside the frame, changing the context.
- The cleaned‑up version might imply the scene was less crowded than it really was, because the tool removed the arms of the people next to me.
- The colorized version might imply the grass at Yankee Stadium looked a certain way that day, when the original didn't capture that detail.
- The colorization might suggest Munson wore an undershirt of a particular shade, a detail the model had to invent.
None of these facts are necessarily germane to the image, but they absolutely can alter its interpretation. Still images can present scenes in a framing that doesn't completely do it justice, while AI can introduce confident, plausible details that were never in evidence, whether done maliciously or not.
This is why labeling matters. Not because AI involvement is inherently bad, but because, in most cases, viewers deserve to know which parts of an image are grounded in reality and which parts were reconstructed, inferred, or imagined. However, defining those rules is an area where a poor definition could let some people get away with anything while the rest of us end up having to tag everything as AI generated, turning the label into just more noise.
This isn't even touching the copyright issues
Everything above is about truth: what happened, what didn't, and what an image implies, but there's a whole separate dimension we haven't entered: copyright.
Questions like:
- What training data was used to create the model?
- Who owns the derivative works?
- When does enhancement become transformation?
- What rights do I retain over my own childhood photo once an AI model has touched it?
These aren't footnotes. They're large, unresolved questions that deserve their own analysis and probably their own regulatory framework. Mixing them into the "AI‑generated vs. not" debate only makes everything muddier. So for this post, I'm deliberately setting copyright aside; not because it's unimportant, but because it's too important to treat as a parenthetical.
The Hard Part Is Defining What Matters
The reasons why blanket rules about "AI‑generated content" fall apart are complicated. The line between "generated," "assisted," "enhanced," and "restored" isn't a line at all, it's a gradient. That doesn't mean we shouldn't regulate AI‑involved media. It means we need to regulate AI with language and intent that actually matches reality, and solves the real problems.
There are cases where labeling is essential, but most of it is context specific. If I am posting a picture of a conference talk I gave, I wouldn't feel right adding fake participants in the crowd, but I'd often be fine with editing someone out who asked me to, depending on the reason for doing so. I might not feel the same way if the photograph was being published as part of a story in the news. However, there are some things that should probably always be disclosed:
- Images of things that never happened should be labeled as such.
- Images containing people that don't exist must be disclosed.
- Images where people or evidence is added absolutely require clear disclosure, even if they are believed to be 'real'.
- AI‑assisted reconstructions, such as those built from text descriptions after the fact, should be labeled in way that allows viewers understand what's real and what's assumed.
Those distinctions matter because they speak to truth, provenance, and the potential for harm, and they remain just as important whether AI is part of the process or not.
But my three images of Thurman Munson? They're all the same moment, they differ only in the tools used to reveal it. In most contexts, there is no meaningful change made by these manipulations.
There are already existing sets of rules we can lean on here. The National Press Photographers Association has a Code of Ethics for visual journalists that includes the following:
Editing should maintain the integrity of the photographic image's content and context. Do not manipulate images or add or alter sound in any way that can mislead viewers or misrepresent subjects.
I would ask you, "Does my manipulation of this image mislead viewers or misrepresent subjects?"
This Code of Ethics also includes composition and subject matter rules such as:
- Resist being manipulated by staged photo opportunities
- Be complete and provide context when photographing or recording subjects
- While photographing subjects, do not intentionally contribute to, alter, or seek to alter or influence events
- Do not pay sources or subjects or reward them materially for information or participation
- Do not accept gifts, favors, or compensation from those who might seek to influence coverage
All of which suggests that the editing of images, the part that can be done using AI, is just a small part of the harm that can be done through visual means, albeit one that scales better than most.
Here's the part we can't ignore
AI, in some form, is nearly always involved now. Not the headline‑grabbing generative models that synthesize faces or fabricate events, but the quiet, invisible systems inside scanners, cameras, phones, and photo apps, the ones nobody notices because they don't feel like AI. Processes like sharpening, noise reduction, auto‑contrast, white‑balance correction, lens‑distortion fixes and de‑mosaicing filters are all part of many of the image capture mechanisms we use every day. Other domains have similar tools used for autocorrect, predictive-text, grammar correction, spellcheck, voice-to-text, spam filtering and recommendations. These are all machine‑learning (ML) systems doing work behind the scenes.
So the question can't be "Was AI used?" The questions must be more akin to "What kind of AI was used, how was it used, and to what effect?". These questions need to be answered in the full context of the situation, because the truth of this photo is simple, AI didn't create it, it actually happened. The tools just helped me see it more clearly, but they can also help someone else see something that was never there. Outside of this one childhood snapshot, it's rarely even that simple.
Knowing the difficulty in categorizing these three versions of a childhood photo as 'AI-generated' or not, it is obvious that we can't build policy around such a binary definition. We need rules that focus on intent, impact, and what claims are being made, not on whether a model was somewhere in the toolchain. We will drill into more detail on how we can craft regulations that take these items into account in future posts.
Tags: ai ethics legislation ml opinion
Types of AI Models
Posted by bsstahl on 2025-11-06 and Filed Under: tools
It is a common misconception that to have an Artificial Intelligence you must have some form of machine learning. This belief has become so pervasive in recent years that many developers and business leaders assume that AI and ML are synonymous terms, or worse, that LLMs are the definition of AI. However, this couldn't be further from the truth.
Artificial Intelligence is a broad field that encompasses a wide spectrum of computational approaches. While Machine Learning (ML) and Large Language Models (LLMs) are important subfields, AI also includes rule-based logic, search/optimization techniques, and Hybrid approaches. AI is not synonymous with ML or LLM.
Understanding the different types of AI models is crucial for several reasons:
- Choosing the Right Tool: Different problem domains require different approaches. A rules-based system might be more appropriate than a neural network for certain business logic scenarios.
- Explainability Requirements: Some applications demand clear explanations of how decisions are made, which varies across AI model types.
- Resource Constraints: Different AI approaches have vastly different requirements for data, computational power, and development expertise.
- Risk Management: Understanding the strengths and limitations of each approach helps in making informed decisions about where and how to deploy AI systems.
By exploring the full landscape of AI model types, we can make better architectural decisions and avoid the trap of applying machine learning solutions to problems that might be better solved with other AI approaches.
What is AI
An AI is a computational system that behaves rationally.
In the context of AI, rational behavior means making decisions that are optimal or near-optimal given the system's goals, available information, and understanding of the problem domain. This simple definition captures the essence of what distinguishes artificial intelligence from conventional software.
More comprehensively, an AI is a computational system that autonomously evaluates situations and makes decisions by attempting to optimize outcomes based on its model of the problem domain and available data, often while handling uncertainty and incomplete information.
At its core, an artificial intelligence system is designed to make decisions autonomously. Unlike traditional software that simply executes predetermined instructions, an AI system evaluates situations and attempts to make the best possible decision based on two critical components: its understanding of the problem domain (the model) and the available information about the current situation (the data).
This decision-making process is what distinguishes AI from simpler computational systems. The AI doesn't just process data--it interprets that data through the lens of its model to determine the most rational course of action. Furthermore, many AI systems go beyond just making decisions; they can also act on those decisions through automation, creating a complete cycle from data input to actionable output.
The key difference between an AI and a decision support system (DSS) is that the DSS aggregates and presents data such that the user can make the best decision whereas the AI attempts to make the decision itself. This autonomous decision-making capability is what transforms a helpful tool into an intelligent agent.
The Categories of AI Models
I find it useful to categorize AI models into four families: Logical Models; Probabilistic/Learning Models; Optimization/Search Models; Hybrid Models. Each category has distinct characteristics, typical use cases, and trade-offs in explainability and performance.
Logical Models
Logical AI models are perhaps the most familiar to traditional software developers because they operate using deterministic rules and conditional logic. These systems make decisions by following explicit, programmed instructions that can be reduced to if-then statements and boolean logic.
This category includes both object-oriented programming approaches (which encompass most traditional software development) and rules engines. While it might seem counterintuitive to classify conventional programming as AI, these systems qualify as artificial intelligence when they autonomously make decisions based on their programmed logic and available data, rather than simply executing predetermined workflows.
The key distinction is that logical AI systems evaluate conditions and make rational decisions within their domain, even if those decisions follow deterministic patterns. A sophisticated business rules engine that processes complex scenarios and determines appropriate actions is exhibiting rational behavior, even though its decision-making process is entirely transparent and predictable.
Features of Logical Models
- Results Explainable: Generally - Code is highly imperative
- Correctness Understood: Generally - Code is highly imperative
- Solution Discoverability: Low - Code is highly imperative
Probabilistic/Learning Models
Probabilistic and learning models represent the category most people think of when they hear "artificial intelligence" today. These stochastic systems operate by learning patterns from data and making predictions based on statistical relationships rather than explicit rules. Unlike logical models, they don't follow predetermined decision trees but instead develop their own understanding of how to map inputs to outputs.
What makes these models unique is their ability to handle uncertainty and incomplete information. They excel in domains where the relationships between variables are complex, non-linear, or not fully understood by human experts. Rather than requiring programmers to explicitly code every decision path, these systems discover patterns and relationships autonomously through exposure to training data.
These models are most appropriate when you have large amounts of historical data, when the problem domain is too complex for rule-based approaches, or when you need the system to adapt and improve over time. They're particularly powerful for tasks like image recognition, natural language processing, fraud detection, and recommendation systems where traditional programming approaches would be impractical.
However, this power comes with significant trade-offs. The decision-making process is often opaque—even to the system's creators—making it difficult to understand why a particular decision was made. Additionally, their correctness can only be evaluated statistically across many examples rather than being guaranteed for any individual case.
Examples of Probabilistic/Learning Models
- Neural/Bayesian Networks
- Genetic Algorithms
Features of Probabilistic/Learning Models
- Results Explainable: Rarely
- Correctness Understood: Somewhat - Unknown at design time, potentially known at runtime
- Solution Discoverability: High - Solutions may surprise the implementers
Optimization/Search Models
Optimization and search models represent a mathematical approach to artificial intelligence that focuses on finding the best possible solution within a defined solution space. These systems work by systematically exploring possible solutions and applying mathematical techniques to converge on optimal or near-optimal answers to well-defined problems.
What makes these models unique is their foundation in mathematical optimization theory and their ability to guarantee certain properties about their solutions. Unlike probabilistic models that learn from data, optimization models work with explicit mathematical formulations of problems and constraints. They excel at finding provably optimal solutions when the problem can be properly formulated and the solution space is well-defined.
These models are most appropriate for problems with clear objectives, well-understood constraints, and quantifiable outcomes. They shine in scenarios like resource allocation, scheduling, route planning, portfolio optimization, and supply chain management where you need to maximize or minimize specific metrics subject to known limitations. They're particularly valuable when you need to justify decisions with mathematical rigor or when regulatory requirements demand explainable optimization processes.
The trade-off with optimization models is that they require problems to be formulated in specific mathematical ways, which can be limiting for complex real-world scenarios. Their solution discoverability is constrained by how well the problem is modeled and the algorithms chosen for implementation. However, when applicable, they often provide the most reliable and defensible solutions.
Examples
- Dynamic Programming
- Linear Programming
Features
- Results Explainable: Sometimes - dependent on implementation
- Correctness Understood: Somewhat - dependent on implementation
- Solution Discoverability: Limited - solutions will likely be limited by the implementations
Hybrid Models
Hybrid AI models combine multiple AI approaches to leverage the strengths of different model types while mitigating their individual weaknesses. Rather than relying on a single technique, hybrid systems strategically integrate logical, probabilistic, and optimization approaches to solve complex problems that no single model type could handle effectively.
What makes hybrid models particularly powerful is their ability to provide both optimal solutions and explainable reasoning. This addresses one of the key limitations identified by IBM Fellow Grady Booch regarding systems like AlphaGo: while they can make optimal decisions, they cannot explain why those decisions were made.
Hybrid approaches can iteratively combine optimization engines with logical reasoning to create systems that not only find the best solutions but can also explain their decision-making process. For detailed examples of how this works in practice, see my previous articles on AI That Can Explain Why and An Example of a Hybrid AI Implementation, which demonstrate hybrid systems for employee scheduling and conference planning that provide both optimal solutions and clear explanations for why certain constraints couldn't be satisfied.
This approach is most appropriate when you need both optimal solutions and the ability to explain decisions to stakeholders. It's particularly valuable in scenarios like resource allocation, scheduling, and assignment problems where users need to understand not just what the solution is, but why certain trade-offs were necessary.
Features of Hybrid Models
- Results Explainable: Often - Depends on the combination of techniques used
- Correctness Understood: Often - Combines the characteristics of constituent models
- Solution Discoverability: Moderate to High - Can surprise implementers while providing reasoning
Conclusion
Understanding the different types of AI models is essential for making informed architectural decisions and choosing the right approach for your specific problem domain. Each model type offers distinct advantages and trade-offs that make them suitable for different scenarios.
Logical Models are ideal when you need transparent, explainable decision-making processes and have well-defined business rules. They're perfect for regulatory environments, business process automation, and scenarios where every decision must be auditable and justifiable.
Probabilistic/Learning Models excel when dealing with complex patterns, large datasets, and problems where traditional programming approaches would be impractical. They're the go-to choice for image recognition, natural language processing, and scenarios where the system needs to adapt and improve over time.
Optimization/Search Models are most valuable when you have clearly defined objectives, constraints, and need mathematically optimal solutions. They shine in resource allocation, scheduling, and planning problems where efficiency and optimality are paramount.
Hybrid Models combine the best of multiple approaches, providing both optimal solutions and explainable reasoning. They're particularly valuable in complex business scenarios where stakeholders need to understand not just what the solution is, but why certain trade-offs were necessary.
Feature Comparison
| Model Type | Results Explainable | Correctness Understood | Solution Discoverability |
|---|---|---|---|
| Logical | Generally | Generally | Low |
| Probabilistic/Learning | Rarely | Somewhat | High |
| Optimization/Search | Sometimes | Somewhat | Limited |
| Hybrid | Often | Often | Moderate to High |
It is important to remember that artificial intelligence is not synonymous with machine learning. By understanding the full spectrum of AI approaches available, you can select the most appropriate technique for your specific requirements, constraints, and stakeholder needs. Sometimes the best solution isn't the most sophisticated one—it's the one that best fits your problem domain and organizational context.
Glossary
- AI: Artificial Intelligence, a broad family of computational techniques for solving problems and making decisions.
- ML: Machine Learning, a subset of AI focused on learning from data to improve performance over time.
- LLM: Large Language Model, a class of ML models specialized for natural language understanding and generation.
- DSS: Decision Support System, a traditional software system that supports decision making, distinct from autonomous AI.
- Explainability: The degree to which a system's decisions can be understood by humans.
Tags: development ai
The Depth of GPT Embeddings
Posted by bsstahl on 2023-10-03 and Filed Under: tools
I've been trying to get a handle on the number of representations possible in a GPT vector and thought others might find this interesting as well. For the purposes of this discussion, a GPT vector is a 1536 dimensional structure that is unit-length, encoded using the text-embedding-ada-002 embedding model.
We know that the number of theoretical representations is infinite, being that there are an infinite number of possible values between 0 and 1, and thus an infinite number of values between -1 and +1. However, we are not working with truly infinite values since we need to be able to represent them in a computer. This means that we are limited to a finite number of decimal places. Thus, we may be able to get an approximation for the number of possible values by looking at the number of decimal places we can represent.
Calculating the number of possible states
I started by looking for a lower-bound for the value, and incresing fidelity from there. We know that these embeddings, because they are unit-length, can take values from -1 to +1 in each dimension. If we assume temporarily that only integer values are used, we can say there are only 3 possible states for each of the 1536 dimensions of the vector (-1, 0 +1). A base (B) of 3, with a digit count (D) of 1536, which can by supplied to the general equation for the number of possible values that can be represented:
V = BD or V = 31536
The result of this calculation is equivalent to 22435 or 10733 or, if you prefer, a number of this form:
10000000000000000000000000000000000000000000000000000000000000000000000000000000000000000000000000000000000000000000000000000000000000000000000000000000000000000000000000000000000000000000000000000000000000000000000000000000000000000000000000000000000000000000000000000000000000000000000000000000000000000000000000000000000000000000000000000000000000000000000000000000000000000000000000000000000000000000000000000000000000000000000000000000000000000000000000000000000000000000000000000000000000000000000000000000000000000000000000000000000000000000000000000000000000000000000000000000000000000000000000000000000000000000000000000000000000000000000000000000000000000000000000000000000000000000000000000000000000000000000000000000000000
Already an insanely large number. For comparison, the number of atoms in the universe is roughly 1080.
We now know that we have at least 10733 possible states for each vector. But that is just using integer values. What happens if we start increasing the fidelity of our value. The next step is to assume that we can use values with a single decimal place. That is, the numbers in each dimension can take values such as 0.1 and -0.5. This increases the base in the above equation by a factor of 10, from 3 to 30. Our new values to plug in to the equation are:
V = 301536
Which is equivalent to 27537 or 102269.
Another way of thinking about these values is that they require a data structure not of 32 or 64 bits to represent, but of 7537 bits. That is, we would need a data structure that is 7537 bits long to represent all of the possible values of a vector that uses just one decimal place.
We can continue this process for a few more decimal places, each time increasing the base by a factor of 10. The results can be found in the table below.
| B | Example | Base-2 | Base-10 |
|---|---|---|---|
| 3 | 1 | 2435 | 733 |
| 30 | 0.1 | 7537 | 2269 |
| 300 | 0.01 | 12639 | 3805 |
| 3000 | 0.001 | 17742 | 5341 |
| 30000 | 0.0001 | 22844 | 6877 |
| 300000 | 0.00001 | 27947 | 8413 |
| 3000000 | 0.000001 | 33049 | 9949 |
| 30000000 | 0.0000001 | 38152 | 11485 |
| 300000000 | 0.00000001 | 43254 | 13021 |
| 3000000000 | 0.000000001 | 48357 | 14557 |
| 30000000000 | 1E-10 | 53459 | 16093 |
| 3E+11 | 1E-11 | 58562 | 17629 |
This means that if we assume 7 decimal digits of precision in our data structures, we can represent 1011485 distinct values in our vector.
This number is so large that all the computers in the world, churning out millions of values per second for the entire history (start to finish) of the universe, would not even come close to being able to generate all of the possible values of a single vector.
What does all this mean?
Since we currently have no way of knowing how dense the representation of data inside the GPT models is, we can only guess at how many of these possible values actually represent ideas. However, this analysis gives us a reasonable proxy for how many the model can hold. If there is even a small fraction of this information encoded in these models, then it is nearly guaranteed that these models hold in them insights that have never before been identified by humans. We just need to figure out how to access these revelations.
That is a discussion for another day.
Tags: ai embedding
Continuing a Conversation on LLMs
Posted by bsstahl on 2023-04-13 and Filed Under: tools
This post is the continuation of a conversation from Mastodon. The thread begins here.
Update: I recently tried to recreate the conversation from the above link and had to work far harder than I would wish to do so. As a result, I add the following GPT summary of the conversation. I have verified this summary and believe it to be an accurate, if oversimplified, representation of the thread.
The thread discusses the value and ethical implications of Language Learning Models (LLMs).
@arthurdoler@mastodon.sandwich.net criticizes the hype around LLMs, arguing that they are often used unethically, or suffer from the same bias and undersampling problems as previous machine learning models. He also questions the value they bring, suggesting they are merely language toys that can't create anything new but only reflect what already exists.
@bsstahl@CognitiveInheritance.com, however, sees potential in LLMs, stating that they can be used to build amazing things when used ethically. He gives an example of how even simple autocomplete tools can help generate new ideas. He also mentions how earlier LLMs like Word2Vec were able to find relationships that humans couldn't. He acknowledges the potential dangers of these tools in the wrong hands, but encourages not to dismiss them entirely.
@jeremybytes@mastodon.sandwich.net brings up concerns about the misuse of LLMs, citing examples of false accusations made by ChatGPT. He points out that people are treating the responses from these models as facts, which they are not designed to provide.
@bsstahl@CognitiveInheritance.com agrees that misuse is a problem but insists that these tools have value and should be used for legitimate purposes. He argues that if ethical developers don't use these tools, they will be left to those who misuse them.
I understand and share your concerns about biased training data in language models like GPT. Bias in these models exists and is a real problem, one I've written about in the past. That post enumerates my belief that it is our responsibility as technologists to understand and work around these biases. I believe we agree in this area. I also suspect that we agree that the loud voices with something to sell are to be ignored, regardless of what they are selling. I hope we also agree that the opinions of these people should not bias our opinions in any direction. That is, just because they are saying it, doesn't make it true or false. They should be ignored, with no attention paid to them whatsoever regarding the truth of any general proposition.
Where we clearly disagree is this: all of these technologies can help create real value for ourselves, our users, and our society.
In some cases, like with crypto currencies, that value may never be realized because the scale that is needed to be successful with it is only available to those who have already proven their desire to fleece the rest of us, and because there is no reasonable way to tell the scammers from legit-minded individuals when new products are released. There is also no mechanism to prevent a takeover of such a system by those with malicious intent. This is unfortunate, but it is the state of our very broken system.
This is not the case with LLMs, and since we both understand that these models are just a very advanced version of autocomplete, we have at least part of the understanding needed to use them effectively. It seems however we disagree on what that fact (that it is an advanced autocomplete) means. It seems to me that LLMs produce derivative works in the same sense (not method) that our brains do. We, as humans, do not synthesize ideas from nothing, we build on our combined knowledge and experience, sometimes creating things heretofore unseen in that context, but always creating derivatives based on what came before.
Word2Vec uses a 60-dimensional vector store. GPT-4 embeddings have 1536 dimensions. I certainly cannot consciously think in that number of dimensions. It is plausible that my subconscious can, but that line of thinking leads to the the consideration of the nature of consciousness itself, which is not a topic I am capable of debating, and somewhat ancillary to the point, which is: these tools have value when used properly and we are the ones who can use them in valid and valuable ways.
The important thing is to not listen to the loud voices. Don't even listen to me. Look at the tools and decide for yourself where you find value, if any. I suggest starting with something relatively simple, and working from there. For example, I used Bing chat during the course of this conversation to help me figure out the right words to use. I typed in a natural-language description of the word I needed, which the LLM translated into a set of possible intents. Bing then used those intents to search the internet and return results. It then used GPT to summarize those results into a short, easy to digest answer along with reference links to the source materials. I find this valuable, I think you would too. Could I have done something similar with a thesaurus, sure. Would it have taken longer: probably. Would it have resulted in the same answer: maybe. It was valuable to me to be able to describe what I needed, and then fine-tune the results, sometimes playing-off of what was returned from the earlier requests. In that way, I would call the tool a force-multiplier.
Yesterday, I described a fairly complex set of things I care to read about when I read social media posts, then asked the model to evaluate a bunch of posts and tell me whether I might care about each of those posts or not. I threw a bunch of real posts at it, including many where I was trying to trick it (those that came up in typical searches but I didn't really care about, as well as the converse). It "understood" the context (probably due to the number of dimensions in the model and the relationships therein) and labeled every one correctly. I can now use an automated version of this prompt to filter the vast swaths of social media posts down to those I might care about. I could then also ask the model to give me a summary of those posts, and potentially try to synthesize new information from them. I would not make any decisions based on that summary or synthesis without first verifying the original source materials, and without reasoning on it myself, and I would not ever take any action that impacts human beings based on those results. Doing so would be using these tools outside of their sphere of capabilities. I can however use that summary to identify places for me to drill-in and continue my evaluation, and I believe, can use them in certain circumstances to derive new ideas. This is valuable to me.
So then, what should we build to leverage the capabilities of these tools to the benefit of our users, without harming other users or society? It is my opinion that, even if these tools only make it easier for us to allow our users to interact with our software in more natural ways, that is, in itself a win. These models represent a higher-level of abstraction to our programming. It is a more declarative mechanism for user interaction. With any increase in abstraction there always comes an increase in danger. As technologists it is our responsibility to understand those dangers to the best of our abilities and work accordingly. I believe we should not be dismissing tools just because they can be abused, and there is no doubt that some certainly will abuse them. We need to do what's right, and that may very well involve making sure these tools are used in ways that are for the benefit of the users, not their detriment.
Let me say it this way: If the only choices people have are to use tools created by those with questionable intent, or to not use these tools at all, many people will choose the easy path, the one that gives them some short-term value regardless of the societal impact. If we can create value for those people without malicious intent, then the users have a choice, and will often choose those things that don't harm society. It is up to us to make sure that choice exists.
I accept that you may disagree. You know that I, and all of our shared circle to the best of my knowledge, find your opinion thoughtful and valuable on many things. That doesn't mean we have to agree on everything. However, I hope that disagreement is based on far more than just the mistrust of screaming hyperbolists, and a misunderstanding of what it means to be a "overgrown autocomplete".
To be clear here, it is possible that it is I who is misunderstanding these capabilities. Obviously, I don't believe that to be the case but it is always a possibility, especially as I am not an expert in the field. Since I find the example you gave about replacing words in a Shakespearean poem to be a very obvious (to me) false analog, it is clear that at lease one of us, perhaps both of us, are misunderstanding its capabilities.
I still think it would be worth your time, and a benefit to society, if people who care about the proper use of these tools, would consider how they could be used to society's benefit rather than allowing the only use to be by those who care only about extracting value from users. You have already admitted there are at least "one and a half valid use cases for LLMs". I'm guessing you would accept then that there are probably more you haven't seen yet. Knowing that, isn't it our responsibility as technologists to find those uses and work toward creating the better society we seek, rather than just allowing extremists to use it to our detriment.
Update: I realize I never addressed the issue of the models being trained on licensed works.
Unless a model builder has permission from a user to train their models using that user's works, be it an OSS or Copyleft license, explicit license agreement, or direct permission, those items should not be used to train models. If it is shown that a model has been trained using such data sets, and there have been indications (unproven as yet to my knowledge) that this may be the case for some models, especially image-generators, then that is a problem with those models that needs to be addressed. It does not invalidate the general use of these models, nor is it an indictment of any person or model except those in violation. Our trademark and copyright systems are another place where we, as a society, have completely fallen-down. Hopefully, that collapse will not cause us to forsake the value that these tools can provide.
Tags: coding-practices development enterprise responsibility testing ai algorithms ethics mastodon
Beta Tools and Wait-Lists
Posted by bsstahl on 2023-04-12 and Filed Under: tools
Here's a problem I am clearly privileged to have. I'll be working on a project and run into a problem. I search the Internet for ways to solve that problem and find a beta product that looks like a very interesting, innovative way to solve that problem. So, I sign up for the beta and end up getting put on a waitlist. This doesn't help me, at least not right now. So, I go off and find another way to solve my problem and continue doing what I'm doing and forget all about the beta program that I signed up for.
Then, at some point, I get an email from them saying congratulations you've been accepted to our beta program. Well, guess what? I don't even remember who you are or what problem I was trying to solve anymore or even if I actually even signed up for it. In fact, most of the time that I get emails like that, I just assume that it is another spam email.
I understand there are valid reasons for sometimes putting customers on wait-lists. I also understand that sometimes companies just try to create artificial scarcity so that their product takes on a cool factor. Please know that, if this is what you're doing, you're likely losing as many customers as you would gain if not more, and may be putting your very existence at risk.
I wonder how many cool products I've missed out on because of that delay in getting access? I wonder how many cool products just died because they weren't there for people when they actually needed them?
Tags: ethics
Teach Students how to Use ChatGPT
Posted by bsstahl on 2022-12-17 and Filed Under: tools
There have been a number of concerns raised, with clearly more to come, about the use of ChatGPT and similar tools in academic circles. I am not an academic, but I am a professional and I believe these concerns to be misplaced.
As a professional in my field, I should and do use tools like ChatGPT to do my job.
I, and the teams I work with, experiment with ways to use tools like ChatGPT better. We use these tools to create the foundation for our written work. We use them to automate the mundane stuff. We use them as thinking tools, to prompt us with ideas we might not have considered. This is not only allowed, it is encouraged!
Why should it be different for students?
There are several good analogs for ChatGPT that we all have used for years, these include:
The predictive text on our mobile phones - It is the same as pressing the middle word on the virtual keyboard to autocomplete a sentence. That is all this tool does, predict what is the most likely next word based on the inputs.
The template in your chosen word processing software (i.e. MS Word or Google Docs) - Both will create a framework for you where you fill in the details. This is really all that ChatGPT does, it just does it in a more visually impressive way.
Grammar and Thesaurus Software - "Suggests" words that can be modified to make the meaning clearer or the language more traditionally appropriate.
Wikipedia, or other information aggregator - A source of text that can be used as a starting point for research, or a source of plagiarized material, at the discretion of the user.
Nobody thinks twice about using any of these tools anymore, though there was certainly concern early-on about Wikipedia. This is probably due to reasons like these:
If anyone, student or professional, produced a work product that was just an unmodified template, it would considered very sloppy and incomplete work, and would be judged as such on its merits.
If anyone, student or professional, produced a work product that was copied from Wikipedia or other source, without significant modification or citation, there would be clear evidence of that fact available via the Internet.
ChatGPT is concerning to academics because it has become good enough at doing the work of these template and predictive tools to pass a higher standard of review, and its use cannot be proven, only given a probability score. However, like all tools, the key is not that it is used, but how it is used.
The text that ChatGPT produces is generated probabilistically. It is not enough just to have it spit out a template and submit it as work product. Its facts need to be verified (and are often wrong). Its "analysis" needs to be tested and verified. Its "writing" needs to be clarified and organized. When you submit work where ChatGPT was used to automate the mundane task of generating the basic layout, you are saying that you have verified the text and that you stand behind it. It is your work and you are approving it. If it has lied, you have lied. If the words it spit-out result in a bad analysis, it is your bad analysis. The words are yours when you submit them regardless of whether they were generated via the neural network of your brain, the artificial neural network of ChatGPT, or some other, perhaps procedural method.
I'll say it clearly for emphasis:
All work should be judged on its merits
Educators should teach how to use these tools responsibly and safely
Academics and professionals alike, please do not attempt to legislate the use of these tools. Instead, focus on how they should be used. Teach ethical and safe usage of these tools in a similar way to how we teach students to use Wikipedia. These productivity aids are not going away, they are only going to get better. We need to show everyone how to use them to their advantage, and to the advantage of their teams and of society.
My field of Software Engineering is primarily about solving problems. To solve problems, we describe solutions to these problems in ways that are easy for a machine to interpret. The only difference between the code I write that goes into a compiler to be turned into machine-executable instructions, and the code I write to go into ChatGPT is the language that I use to describe my intent. Using ChatGPT is just writing a computer program using the English language rather than C# or Python. A process such as that should absolutely be encouraged whether the usage is academic or not.
It is my firm belief that the handwringing about the productivity gains that a fantastic tool like ChatGPT can give us is not only misplaced, it is often dangerously misleading.
Addendum
I am only now realizing I should have used ChatGPT to produce the foundations of this text. A missed opportunity to be certain, though to be fair, I originally intended this to be a one or two liner, not an essay.
Disclosure
I have no stake whatsoever in ChatGPT except as a beta user.
Tags: ai ethics chatgpt
Troubleshooting Information for Machinelearning-ModelBuilder Issue #1027
Posted by bsstahl on 2021-04-03 and Filed Under: tools
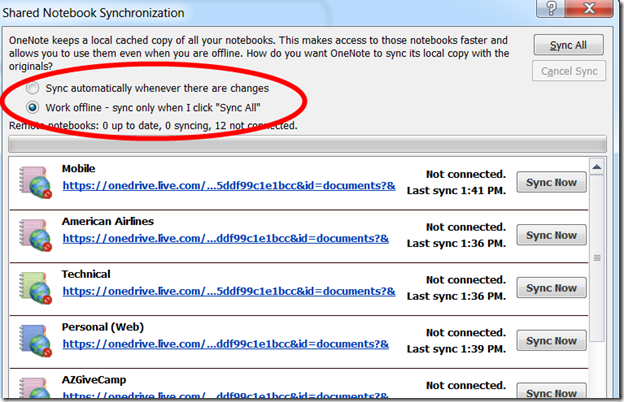
Update: The issue has been resolved. There was an old version of the Extension installed on failing systems that was causing problems with Visual Studio Extensions. Even though the version of the Extension showed as the correct one, an old version was being used. A reinstall of Visual Studio was needed to fix the problem.
There appears to be a problem with the Preview version of the ModelBuilder tool for Visual Studio. This issue has been logged on GitHub and I am documenting my findings here in the hope that they will provide some insight into the problem. I will update this post when a solution or workaround is found.
I want to be clear that this problem is in a preview version, where problems like this are expected. I don't want the team working on this tooling to think that I am being reproachful of their work in any way. In fact, I want to compliment them and thank them for what is generally an extremely valuable tool.
To reproduce this problem, use this Data File to train an Issue Classification or Text Classification model in the ModelBuilder tool by using the Key column to predict the Value column. The keys have intelligence built into them that are valid predictors of the Value (I didn't design this stuff).
Machines that are unable to complete this task get a error stating Specified label column 'Value' was not found. with a stack trace similar to this.
This process seems to work fine on some machines and not on others. I have a machine that it works on, and one that it fails on, so I will attempt to document the differences here.
The first thing I noticed is that the experience within the tool is VERY DIFFERENT even though it is using the exact same version of the Model Builder.
From the machine that is able to train the model

From the machine having the failure

Everything seems to be different. The headline text, the options that can be chosen, and the graphics (or lack thereof). My first reaction when I saw this was to double-check that both machines are actually using the same version of the Model Builder tool.
Verifying the Version of the Tool
Spoiler alert: To the best I am able to verify, both machines are using the same version of the tool.
From the machine that is able to train the model

From the machine having the failure

My next thought is that I'm not looking at the right thing. Perhaps, ML.NET Model Builder (Preview) is not the correct Extension, or maybe the UI for this Extension is loaded separately from the Extension. I can't be sure, but I can't find anything that suggests this is really the case. Perhaps the dev team can give me some insight here.
Verifying the Region Settings of the Machine
While these versions are clearly the same, it is obvious from the graphics that the machines have different default date formats. Even though there are no dates in this data file, and both machines were using US English, I changed the Region settings of the problem machine to match that of the functional machine. Predictably, this didn't solve the problem.
From the machine that is able to train the model

From the machine having the failure - Original Settings

From the machine having the failure - Updated Settings

Checking the Versions of Visual Studio
The biggest difference between the two machines that I can think of, now that the region settings match, is the exact version & configuration of Visual Studio. Both machines have Visual Studio Enterprise 2019 Preview versions, but the working machine has version 16.9.0 Preview 1.0 while the failing machine uses version 16.10.0 Preview 1.0. You'll have to forgive me for not wanting to "upgrade" my working machine to the latest preview of Visual Studio, just in case that actually is the problem, though I suspect that is not the issue.
From the machine that is able to train the model

From the machine having the failure

There are also differences in the installed payloads within Visual Studio between the 2 machines. Files containing information about the installations on each of the machines can be found below. These are the files produced when you click the Copy Info button from the Visual Studio About dialog.
From the machine that is able to train the model
Visual Studio Payloads - Functional Machine
From the machine having the failure
Visual Studio Payloads - Problem Machine
Windows Version
Another set of differences involve the machines themselves and the versions of Windows they are running. Both machines are running Windows 10, but the working machine runs a Pro sku, while the problem machine uses an Enterprise sku. Additionally, the machines have different specs, though they are consistent in that they are both underpowered for what I do. I'm going to have to remedy that.
I've included some of the key information about the machines and their OS installations in the files below. None of it seems particularly probative to me.
From the machine that is able to train the model
System and OS - Functional Machine
From the machine having the failure
System and OS - Problem Machine
Other Things to Check
There are probably quite a number of additional differences I could look at between the 2 machines. Do you have any ideas about what else I could check to give the dev team the tools they need to solve this problem?
Tags: ml modelbuilder
Committing to Git from an Azure DevOps Pipeline
Posted by bsstahl on 2020-06-17 and Filed Under: tools
There are occasions, such as when working with static website generators, that you'll want to push some changes made in an Azure DevOps pipeline, back into the source Git repository. This process is simple enough, but since I have struggled to get it configured twice now, I am documenting the process here for your use, and my future use.
Azure DevOps pipelines typically contain two parts, although other configurations are possible. The two standards are:
- Get sources - gets the information to work with from a Git repository or other source control environment
- Agent Job - holds the tasks required to complete the pipeline
You'll need to take the following steps to configure the interactions between your source control provider and your pipeline:
- Configure the Get sources section of the pipeline by selecting your source control provider from the list of options and then choosing the repository from the list within that provider. For most providers, you will need to supply credentials with access to the repository, although the pipeline may already have the basic access it needs to read from an Azure DevOps Repo.

- [optional] Configure an Agent Job to perform any cleanup of the repo necessary. When building a static website, I first delete all files from the target directory (the old static website files) so that only the files that are still needed are included in the final deployment.
Note: for all Agent Job steps that involve scripting, I use the Command Line task which allows me to execute my scripts in one of the native OS shells (Bash on Linux and macOS and cmd.exe on Windows). You could just as easily use the Powershell task, which is cross-platform or any number of other options.
Execute your build process. This is the step that generates the new files that will eventually be committed back into the source repository. Each static website generator has their own method for creating the site, see the documentation for your tooling for specifics. You can also execute custom tools or scripts here that modify files in the repository any way you'd like.
Execute the commit back to the source repo. This is the money step, where everything that has been done to this point is saved in the repository. As with previous steps, I use the Command Line task to execute the needed commands. My script is shown below. It is written for the Windows cmd.exe shell so commands that start with ECHO are log entries that will be included in the pipeline's execution log to help with troubleshooting and maintenance. This script uses a number of pipeline variables which take the form $(variableName) to make configuration easier. The git.email and git.user variables were defined by me in the Variables section of the pipeline, you will need to either configure those variables yourself, or substitute their values in the script. The Build.SourceVersion and Build.SourceVersionMessage variables are supplied by the pipeline and no action was required on my part to create or enable them.
An interesting thing to note about this script is the git push command. The full command git push origin HEAD:master is required in this case, rather than just a simple git push because, once the files are downloaded into the pipeline repo, the local repository is disconnected from the remote by the pipeline, possibly as a safety measure. We have to tell the local repo to push back to the remote HEAD, or else the push will fail. I suspect there is a way to tell the pipeline not to disconnect the head, but doing things this way, to my knowledge, has no ill-effects and is simple enough that it isn't really worth the effort for me to find out.
ECHO ** Starting "Git config for user: $(git.user)"
git config --global user.email "$(git.email)"
git config --global user.name "$(git.user)"

ECHO ** Starting "Git add..."
git add .

ECHO ** Starting "Git commit..."
git commit -m "Static site rebuild due to commit $(Build.SourceVersion) '$(Build.SourceVersionMessage)'"

ECHO ** Starting "Git push..."
git push origin HEAD:master

ECHO ** Ending Update remote git repo script
Finally, we need to give the pipeline user permission to write to the repository. This is where things can get a bit tricky and hard to find. The key configuration area within Azure DevOps can be found by going to the Project Settings.
For Azure DevOps repositories, select the Repositories tab and click on the [Projectname] Build Service User in the Users section. This will show a list of permissions that the build service user has. There are 4 that are of interest here: Contribute, Create branch, Create tag and Read. Some of those will probably already be enabled for you. I suspect only the Contribute needs to be added at this time, but I usually make sure all 4 are allowed.
For other repositories, things are even more complicated. Accounts need to be configured on the external source control service so that the Build Service User account has the permissions it needs to push to that repository. This may require an SSH configuration, an Auth token, or any number of other mechanisms depending on the source control provider. See that provider's documentation for the specifics.
Update 2022-07-13: There is an additional option that needs to be enabled in the pipeline's Agent Job.
☑ Allow scripts to access the OAuth tokenThis option must be checked so that the script can acquire the permissions to update the repository.
There are other ways to do all of this of course. One idea that intrigues me that I haven't tried yet is to have the build service submit a pull-request to the remote git repo. This would require an additional approval step before the changes are merged into the repo. For static websites where merging into master is the equivalent of publishing the site, this might give me the opportunity to review the built site before it is actually deployed.
Have you tried this pull-request method, or used this kind of technique with an non-Azure DevOps repo? If so, please let me know about it @bsstahl.
Tags: ci_cd git azure devops azure devops
Use One Email Alias per Account
Posted by bsstahl on 2015-10-05 and Filed Under: tools
One of the things I do to take better control of my online presence is to use a different email address for every online service that I use. I do this for 3 main reasons:
1. To Reduce Spam
If a single alias starts receiving spam, I have a number of options:
- Since the alias is only used with 1 service, I can create a new alias for that service, update my profile on their website, and delete the old alias
- If I no-longer feel like I need to receive email from that service, I can simply delete the alias.
I can also determine if a company is selling my email address to spammers. If I have to recreate the alias for a single service more that once or twice due to spam, I can probably assume they are selling my address and take the appropriate steps. Finally, since I am using non-standard email addresses (not my name@, or info@, etc) they are harder for spammers to guess and therefore less susceptible to spam.
2. To Help Prevent Companies from Tracking Me Across Sites
One of the ways companies can line-up data about me across multiple services or websites is by my email address. Since many people use the same email address across all services, it can becomes an easy way to be confident that a user of one site, is the same person as the user of another site. It is common today for a single company to have many different brands and properties, and to combine data from all of them (or sell that data to others) in order to learn more about us. As a result, it can be a benefit to our privacy if we use a different email address for each.
That being said, it should be noted that there are a number of other ways companies can track us across sites. To truly do what you can to protect your privacy, there are several other steps you should take to prevent your data from being tracked across sites. Using different email aliases is just one step. Perhaps I will make this the subject of a future post.
3. To Help Protect Me in Case of Data Breach
Perhaps the most important reason for using a different email alias for every service is that eventually, my data at one or more of these services, will be compromised. Like companies who legally have access to my data, hackers can use their illegally obtained data to also try to match-up my accounts across multiple breaches, or across multiple sites. For example, a single data set can provide thousands of email/password combinations that can be tried at common sites like Twitter, or at banking, government and other key service sites. It makes sense that we do everything we reasonably can to protect our own information since we can't assume that the companies holding it will be able to protect it forever.
Pick a Method and Use It
I recommend using Outlook.com to create email aliases since that service allows you to create truly distinct aliases and tie them to the same account. Gmail can also create many aliases per account, but they all start with the same alias and just end with a plus sign and then the unique portion of the alias (i.e. myaccount+Guid1@gmail.com and myaccount+otherstuff@gmail.com both work as aliases for myaccount@gmail.com). This is better than nothing, but this pattern is easily identifiable and can be filtered-out using software.
A good pattern is to use GUIDs as the email addresses. That is, an address like B99C3900-157A-45F7-AD20-67EF83ED6776@outlook.com or B99C3900157A45F7AD2067EF83ED6776@outlook.com will almost always be available and is impossible to guess. If you create a number of such aliases and keep them with you, perhaps in a OneNote notebook, you will have functional email addresses to give whenever you are asked for a new one. Then you just need to associate that alias with the service in your notebook so you know not to use it again, and so you know where each alias was used.
Do you have a recommendation of an email service or alias pattern that has worked well for you? Sound off in the Fediverse using the hashtag #OneAliasPerAccount.
Tags: email security
Office Lens–Magic in a Free App
Posted by bsstahl on 2015-09-30 and Filed Under: tools
While I was working on my last post, I experimented with some visualizations that I thought might help make my point a bit more clearly. I didn’t end up using them, but the whiteboard exercise that I went through in developing them helped me organize my thoughts, and, I believe, resulted in a better article.
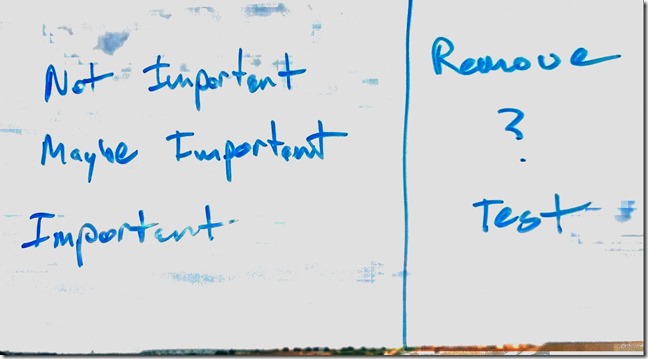
Once I had drawn-out things the way I wanted them, I did what many people do with a whiteboard, I took a photo of it for my notes. The image above shows what resulted. As you can see, it isn’t a bad rendering, although certainly not perfect. The words and structure are both clearly visible and easily readable, but there is nothing all that impressive about it on its own. After all, there are a number of apps out there which can convert a photo of a whiteboard to a similar image. The part where it becomes interesting is when you see the original source photo, shown below.

You see, I was working on the post from my hotel room, and my “whiteboard” was the hotel window. Despite all of the background clutter, I didn’t have to do anything special to get the whiteboard image. I just did what I always do, open Office Lens, select whiteboard, and take a picture. The app did the rest. Not only that, but it also, once I saved it, automatically uploaded it to my OneNote so that, by the time I got back to my laptop, I already had a synced copy of it in OneNote ready to be dragged into the appropriate notebook. Plus, since my phone is set to sync my photos to OneDrive, I already had a copy of both the original image, and the whiteboard image, in my OneDrive Camera Roll. All of this is configurable of course. If you want, Office Lens will just save the images to your phone. But for me, the OneNote integration is a huge time-saver.
Oh, and by the way, it can also function as a document and business card scanner. Magic!
Office Lens is a free app from Microsoft that is available on all major phone platforms.
Tags: onenote apps microsoft phone
OneNote Notebooks remain “Not Connected”
Posted by bsstahl on 2015-04-08 and Filed Under: tools
File this post under saving you some time that I spent worrying.
Recently, I started having problems with my OneNote notebooks not syncing on my primary laptop. Or at least, that’s what it seemed like was happening. I depend a lot on OneNote since I use it for all of my notes, on all of my devices, so this was a very big deal for me. The notebooks all had the little red “not-synced” icon on them, so I would request a manual sync. OneNote went through the process and looked like it was syncing, but at the end, all of the notebooks still had the little red icon on them saying they weren’t current.
The problem turned out to be that I had accidentally changed the radio-button at the top of the sync dialog from “Sync automatically whenever there are changes” to “Work offline - sync only when I click ‘Sync All’”. As a result, the notebooks always looked as if they were not up-to-date (because they might not have been) and were listed as “Not connected”. Of course, if I had looked at the last sync time, I would have seen that all notebooks had been synced as of the last manual sync. Everything was working just fine, I had just changed the setting, making it so my notebooks only synced when I forced it. By changing the radio button setting back to “Sync automatically…”, everything worked as I expected.